There are many options for establishing and adjusting the ball path and reaction as it travels down the lane. Some of these options are: ball selections from your arsenal of balls, ball surface changes, angle adjustments, speed adjustments, and loft adjustments, and of course, most basically, hand release adjustments that can be implemented when a specific ball reaction is called for. This section is focused on primary ways to release the ball to achieve the desired ball reaction.
There are many ways of releasing your bowling ball. Deciding which is best suited for you can greatly affect the path of the ball as it is released from your hand. Which is the right way? The fact is that most of them are right for specific actions. Each can, and will at times, perform better on the lanes than the other releases. Adjust your release to fit the situation.
It is important to establish a single, reliable release as the foundation for your game for a specific lane condition. Your basic release provides the most accurate release you can consistently deliver on a specific lane condition.
First, some basics
As the ball exits your hand at the moment of release, your hand should continue toward your target following the intended ball path. Ideally, the inner side (the soft side) of your elbow should be facing your target at the moment of release. Also, it is key to preventing the elbow from rotating away from the body and “chicken winging” the arm, to keep the inside edge of your elbow near your body on the forward swing as you release the ball. One concept is to call the inside of your elbow your “bowling eye”. You should always keep your eye on the ball as it is released. You can maintain this technique as you focus on your hand action adjustments. It is important to avoid rotating your entire arm, only your wrist or hand position when adjusting your rev-rate or power.
Key to any successful adjustment is a commitment toward honest practice and commit to getting proficient at developing variations to your prime release technique. To not make that commitment, will most likely be the cause of stagnation in your game. There is but one way to improving your release, and that is practice.
Wrist and Finger Adjustments
In most sports, advanced players adjust to playing conditions and situations they confront. Golfers select clubs and/or adjust their hand, shoulders and swing positions as they adjust to changing wind conditions, the distance to the hole, or the shot they see in front of them. Baseball pitchers throw the ball slower, faster, curve or drop the ball for different batters. Baseball batters, on the other hand, adjust their stance, how they hold the bat and the bat that helps them achieve the hit they are attempting. Tennis players select their racquet; adjust their stance, swing and how they hold their racquet to create the ball action that assists them in achieving the best shot.
The more you are exposed to bowling, the more you will notice a wide variety of hand and wrist positions used by bowlers. You, naturally, would hope to select a delivery best suited toward meeting your objectives, but which bowler has the right wrist and finger position? The answer is both! Regardless of the wide variety of wrist styles used in the delivery, it turns out that all of them are functional in one manner or another. There isn’t a single wrist position for every bowler and all situations. Each technique has a purpose and each should be part of your bowling toolbox. These varied styles illustrate the fact that bowlers match their bowling style, including their wrist and finger adjustments, according to the ball surface they are using, the lane conditions and their bowling styles. It is key to your success that you should match your bowling style, your wrist and finger adjustments, ball surface and where you play on the lane. That is the secret toward achieving success in the sport of bowling.
Take a Closer Look at Your Wrist and Fingers
There are three movements of the wrist. You can rotate your wrist, move it laterally side to side, and cup or loosen your wrist position. There are several finger adjustments to consider: after placing your fingers in the ball, you can spread or tighten the space of your small finger (pinky) from your ring finger, you can tuck your little finger to the first or second knuckle, and you can spread or tighten the space of your index finger from your middle finger. You can adjust the pressure of your fingers and gripping, and how that action is applied. Finally, you can combine these adjustments to enhance your ability to control ball action. Wow! So what does each adjustment do, and when should you make these adjustments?
Bowling release adjustments
During the release, your wrist and fingers positions can be adjusted without the entire arm rotating. These release techniques include several variations to your standard release. Hand and wrist adjustments can add or limit power that augments your release to compensate for changing lane conditions. An understanding of these techniques adds variables to your game to overcome changing lane conditions.
There are other considerations other than wrist rotation, but for explanation purposes, we are only focused on the rotation of the wrist in this discussion. The wrist moves on three basic planes: rotational, horizontal, and vertical. In this discussion, we refer only to the rotation around the forearm, and not the horizontal plane toward or outward from the body.
- For explanation purposes, refer to the face of a standard clock having hands.
- Stand erect and let your hands dangle at your sides with your thumbs outward from your body. If you imagine the face of the clock, your thumb will be at around the 3 o’ clock position for right-handers or left-handers at 9 o’ clock.
- It is recommended that right handers will use thumb positions from 4 o’ clock to 11 o’ clock (right-handers) and 8 o’ clock to 1 o’ clock (left-handers).
- Rotating your hand from under the ball and around to the side of the ball from your wrist can be used to raise or lower your ball track. Placing your hand on the side of the ball will cause a lower ball track, and your ball to go longer before it transitions into its hook phase and increase the hook drive. Rotating your hand to be placed behind the ball will raise the ball track, and reduce the hook drive.
- As cautioned earlier, it is important to maintain the angle of your forearm when rotating your wrist. You just want to feel a little more of the weight of the ball on the tip of your index finger as opposed to bending the knuckle to keep your finger in contact with the ball.
- To bowl a straight ball, release the ball with your thumb, ring and middle finger at the 12 o’ clock position. This is a common way of throwing the ball for most beginners. The ball will roll straight off the fingers, and the ball will have little or no side rotation.
- To bowl a “full roller”, release the ball with your thumb in the 9 o’clock position, and your ring and middle finger in the 3o’clock position. This is called the “suitcase” release. The ball will be released and roll along a line between the thumb and fingers, and track completely around the ball. Breaking your wrist (moving your ball in a downward direction) will further ensure a full roller.
- To bowl a “3/4-roller”, release the ball with your thumb in the (rh – 1 o’clock) (lh – 11 o’clock) position. The 3/4-roller will rotate around a horizontal plane as it skids down the lane, and the bowler will achieve a curve or hook ball as the ball enters the pins. The ball will track close to, and outside, of the thumb and finger holes. This track is often referred to as a high tracking release.
- To bowl a “semi-roller”, release the ball with your thumb in the (rh 3 o’clock) (lh 9 o’clock) position. The semi-roller will rotate around a horizontal plane more than the 3/4-roller as it skids down the lane, hook and enter the pin deck at a greater angle than the other releases. The ball will track further away from the thumb and finger holes, and is referred to as a medium tracking release.
As in the previous discussion concerning wrist rotation, there are other considerations other than wrist rotation, but for explanation purposes, we are only focused on the horizontal movement of the hand in this discussion.
The wrist moves on three basic planes: rotation, horizontal, and vertical. In this discussion, we refer only to the horizontal plane toward or outward from the body, and not the rotation around the forearm.
- For explanation purposes, refer to the face of a standard clock having hands.
- Stand erect and hold your arm forward and away from the body, and your palms facing upward. If you imagine the face of the clock, your thumb will be at around the (rh 3 o’ clock) / (lh 9 o’clock) position.
- It is recommended that right handers will use hand positions from 1 o’ clock to 10 o’ clock (right-handers) or 11 o’ clock to 2 o’ clock (left-handers).
To extend the break point
- 12 o’clock Release – The ball is released with your fingers pointing straight forward in the 12 o’clock position.
- As the ball is released, the ball rolls straight up off the fingers with no horizontal turn of the wrist. The ball will roll straight forward, end over end, and the ball’s break point (the point where the ball transitions from skid to hook) will be extended. This release is best suited for dryer lanes.
To curve or hook the ball
- 10:30 Release – The ball is released with fingers angled horizontally pointing at the 10:30 position.
- As the ball is released, the ball travel is toward the pins, but the horizontal rotation of the ball is toward the 10:30 position. The ball will continue to rotate in this direction until the break point, where the increased friction between the ball and lane surfaces causes the ball to change direction toward the 10:30 direction.
- This is, perhaps, the most frequently used wrist positions used by bowlers. This release would be used for freshly dressed house patterns and normal lane conditions.
- 9 o’clock Release – The ball is released with fingers angled horizontally, pointing at the 9 o’clock position.
- As the ball is released, the ball travel is toward the pins, but the horizontal rotation of the ball is toward the 9:00 o’clock direction. The ball will continue to rotate in this direction until the break point, where the increased friction between the ball and lane surface causes the ball to sharply change direction toward the 9:00 direction. The ball rotates and hooks more.
- This release would be most appropriately used for wet lanes and bowlers playing deep to maintain higher angles as the lane track dry up.
- To add rotation to the ball
- Cupped release – Moving the ball up and back to create a greater angle between the hand and forearm creates a cupped release. Holding the ball in this position during the ball swing places additional rotation on the ball as it is released, and makes the ball roll sooner. Additional rotation can create a greater inward drive as the ball rolls into the pocket. This technique is especially useful on heavier-conditioned lanes or where carrydown is an issue.
- To roll a straight ball
- Straight release – Holding the wrist in line with the forearm, not bent either upward or downward, is known as a straight release. The straight release is considered as a medium wrist position, and is, perhaps, the most common and basic wrist position. The straight wrist position is best used for medium lane conditions, and a good starting position.
- Broken release – Angling the wrist downward in a broken position is known as a broken wrist position. Releasing the ball from this position greatly reduces the rotational component of the ball due to the weakened finger lift of the ball as it is released. Releasing the ball with weakened rotation of the ball delays the breakpoint, and the hooking action is either delayed or weakened as well. This release can be used whenever you want to straighten out the ball path: for drier lane conditions or corner pin spares.
| Finger Positions Matter
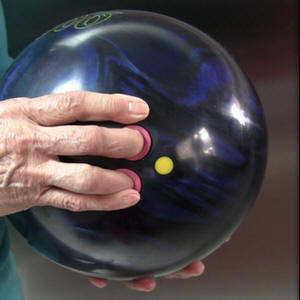
Gripping the ball includes inserting your middle and ring fingers and then your thumb into the gripping holes. The other two fingers, the index and pinkie finger, placement can be adjusted and have an affect on the reaction of the ball travel in the same manner as wrist position adjustments. Both the wrist and finger positions are combined in different combinations to influence the ball motion. Combined with your wrist positioning, finger adjustments can enhance your bowling ball motion even more. These are the basic finger adjustments in bowling |
Base Finger Position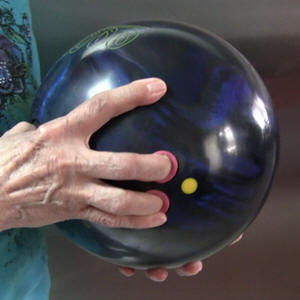 Your index finger is spread comfortably, about half as far as you can spread it wide away from your middle finger. The pinkie finger is kept snuggled tight against the ring finger.The index finger position enhances ball revs, and the ball experiences a smooth and early roll. The smooth curved track enhances the predictability of the ball roll, and is commonly used as a “base” starting finger position. Your index finger is spread comfortably, about half as far as you can spread it wide away from your middle finger. The pinkie finger is kept snuggled tight against the ring finger.The index finger position enhances ball revs, and the ball experiences a smooth and early roll. The smooth curved track enhances the predictability of the ball roll, and is commonly used as a “base” starting finger position. |
The Wide Wide Index Finger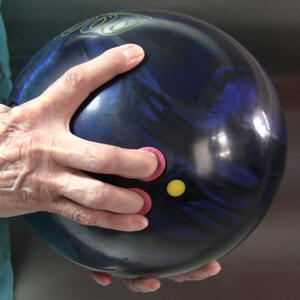 Spreading your index finger as wide as comfortably placed promotes ball revs, and an even earlier ball reaction. A wide spreading of the index finger will give a stronger back end hooking reaction. The pinkie finger is kept snuggled tight against the ring finger. Spreading your index finger as wide as comfortably placed promotes ball revs, and an even earlier ball reaction. A wide spreading of the index finger will give a stronger back end hooking reaction. The pinkie finger is kept snuggled tight against the ring finger.
Adjusting the spread of the index finger in or out 1/2″ at the time can fine tune your ball reaction. |
Tucking the Pinkie Finger Tucking the small finger (the pinkie) in reduces that straightening effect of the pinkie, and enhances the revving action of the spread index finger. Tucking the small finger (the pinkie) in reduces that straightening effect of the pinkie, and enhances the revving action of the spread index finger.
Caution is encouraged when tucking the pinkie. Tucking the small finger under increases pressure on the ring finger, and results in additional revs. This increases pressure can cause some discomfort or pain over a long period of time if not used with caution. When laying out the ball, if the ring finger span is laid out with a slightly shorter span, this can reduce the possibility of discomfort or pain, but may also reduce the enhanced revs of the ball gained by the tucked pinkie. |
Both Index and Pinkie Fingers Spread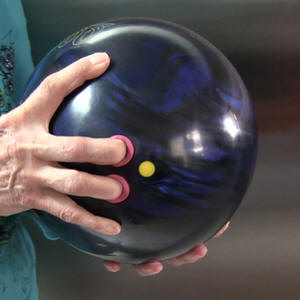 Spreading both the index and pinkie fingers is the most common finger position. Spreading the index and pinkie finger results in the same type of reaction as the wide index, but stronger.With the index finger spread wide and the pinkie finger spread wide, the ball revs early, and the resultant ball action will be a weaker back end. The ball reaction diminishes as it travels toward the pins, resulting in weaker hooking action and pin carry. Spreading both the index and pinkie fingers is the most common finger position. Spreading the index and pinkie finger results in the same type of reaction as the wide index, but stronger.With the index finger spread wide and the pinkie finger spread wide, the ball revs early, and the resultant ball action will be a weaker back end. The ball reaction diminishes as it travels toward the pins, resulting in weaker hooking action and pin carry. |
Pinkie Finger Spread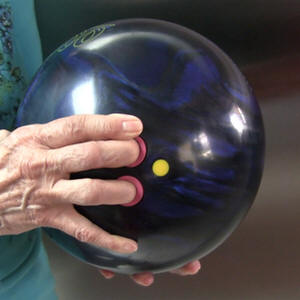 Spreading the pinkie and keeping the index finger snuggled tight against the middle finger places more counter-revving pressure on the track side of the ball. Spreading the pinkie and keeping the index finger snuggled tight against the middle finger places more counter-revving pressure on the track side of the ball.
The spread pinkie finger position results in a higher track, straighter ball with less hooking action. The spread pinkie finger position, with the hand placed directly behind the ball can result in straightening out the path of the ball. By pointing your pinkie finger toward the target enhances a resultant straight ball path. By leaving the pinkie finger spread and snuggling the index finger against the middle finger, results in more end-over-end roll and takes the hook off the ball. This finger adjustment can tame the amount of hook on dry lanes or if you need to play wet or long patterns and you need a direct ball path. |
| Both Fingers Snuggled Against the Middle and Ring Fingers
The ball may feel less stable in your hand, and practice using this technique is important to achieve a consistent delivery. |
 When both the index and pinkie fingers are placed next to the gripping fingers, the ball reaction will be an enhanced angular reaction. The ball will slide further down the lane, raise the ball track higher and hook harder. This finger placement should be considered for use on dryer lanes, or you need to get the ball further down the lane before it hooks.
These are the basic finger adjustments in bowling. Combine these with the various wrist positions to enhance your bowling ball motion even more.

Imagine if it happened to you:
All of a sudden you find this thing on your wrist and people are telling you it has powers.
I would listen a little more closely if I wanted that magic.
Your wrist and fingers must be well educated.
Ball control is simply thinking through your wrist and fingers.
Like fine art, the finest ball control is found through the magic of you fingers.
![]()